
 100% Secure Payments


Hunter Industrial & Commercial is your reliable source for HVLS fans and installation. With over 130 years of experience, we've got a stellar track record of providing high-quality products and exceptional service. Our fans are designed to provide superior air movement, energy efficiency, and durability, making them ideal for a wide range of industrial and commercial applications. Additionally, Hunter offers comprehensive installation and maintenance services, ensuring our products perform at their best for years to come. If you're in the market for an HVLS fan, you'll find the best solution at Hunter Industrial & Commercial.
How to Install an HVLS Ceiling Fan: Industrial Fan Installation Guide
Share:


Installing a high-volume, low-speed (HVLS) ceiling fan is a straightforward process, but can be daunting until you’ve done it once or twice. With the proper instructions, you can install your fan and have it cool down your space in no time. In this article, we'll provide a step-by-step guide on how to install an industrial ceiling fan in your space, covering everything from choosing the right location to installing the digital controller. By following these instructions, you can ensure successful HVLS fan installation and enjoy the benefits of an HVLS ceiling fan for years to come.
TABLE OF CONTENTS
Step 1: Choose Proper Location to Install HVLS Fans Step 2: Safety & Preparation for HVLS FanInstallation Step 3: Secure the Industrial Fan Mount Step 4: Install the HVLS Fan Motor Step 5: Industrial Fan Blade Assembly Step 6: Connecting the Variable Frequency Drive (VFD) Step 7: Installing the HVLS Fan Controls Frequently Asked Questions About How to Install a Ceiling Fan7 Steps to Installing an Industrial Fan
For demonstration purposes, we'll discuss how to install HVLS fans from Hunter Industrial. Naturally, you'll want to follow the instructions that come with your fan, but this will give you an idea of the steps necessary to install an HVLS fan.
Step 1: Choose Proper Location to Install HVLS Fans
Presumably, you've already done the airflow mapping to determine the placement of your fans. Just to review, your HVLS fan will operate best in open areas where the air can move freely from your ceiling to your floor and outward in every direction. Never place your fan near a wall or other obstruction because this will inhibit the airflow and limit the effective coverage area. Ideally, your HVLS fans should be positioned 20 to 30 feet above the floor, but acceptable performance has been demonstrated as low as 10 feet and as high as 50 feet. Extensions (or "downrods") can be used to achieve the best height for your fans. If you have a facility with an exceptionally tall ceiling, you'll need several fans strategically placed throughout to ensure you get enough air movement.
Other things to be aware of when planning your fan system:
- Do not mount the fan beneath a light source, which can cause a strobing effect when the fan is operating.
- Be mindful of blade clearances. Don’t install an HVLS fan too close to things like the chains or wires supporting light fixtures – this can create a safety hazard. Blade clearance should be at least 2 feet ’in every direction.
- When routing the fan’s control cable, run it in a conduit or in a way that avoids lighting fixtures to avoid the possibility of signal noise and operational problems.
Step 2: Safety & Preparation for HVLS Fan Installation
Before installing any Hunter fans, mark off the work area, ensure the circuit breaker is turned off, and follow all lockout/tagout procedures are followed.
Assemble the following tools:
- Ratcheting Wrench Set (Metric)
- Allen Wrench Set (Metric)
- 19mm Deep Socket
- Screwdrivers (Phillips & Flathead)
- Tape Measure
- Magnetic Level
- VFD Hardware (if not included)

Step 3: Secure the Industrial Fan Mount
To ensure your fan is safe and secure, you need to make sure it has a solid foundation. The following are basic instructions on how to install a ceiling fan mounting. These instructions apply to Hunter XP HVLS fans, which have a rigid mount.
Assemble the following tools:
- Use a strut channel to span three points of the building structure and create a stable attachment point for your fan. Don’t install a rigid fan mounting from a single structure such as a purlin, truss, I-beam, or bar joist.
- Bolt the fan mounting plate to the attachment point using the provided hardware. The rigid mount downrod allows up to 33 degrees of adjustment for roof pitch and 5 degrees of adjustment to accommodate an unlevel beam.
- While using the magnetic post level on the downrod to ensure it’s plumb, tighten all 8 locking nuts to 65 foot-pounds.
- Wrap the retention safety cable from the downrod around the beam or building structure.
- Ensure the retention cable length is shorter than the power cable at the motor connection. Coil the excess cable and secure it with the provided clamps.
Step 4: Install the HVLS Fan Motor
Remove the motor from its package, being careful never to lift the motor by the motor power cable. Then proceed with the following steps:
Assemble the following tools:
- Line up the holes from the retention cable into the fork.
- Insert the clevis pin into the retention rod and secure it with the provided clip.
- Connect the plug from the motor and the downrod. Twist the connector to lock.
- Lift the motor assembly while feeding the studs through the downrod flange.
- Gently feed the excess wire and cable through the top of the downrod.
- Be sure not to pinch the cable between the motor and the downrod flange.
- Secure each stud with the nylon lock nuts.
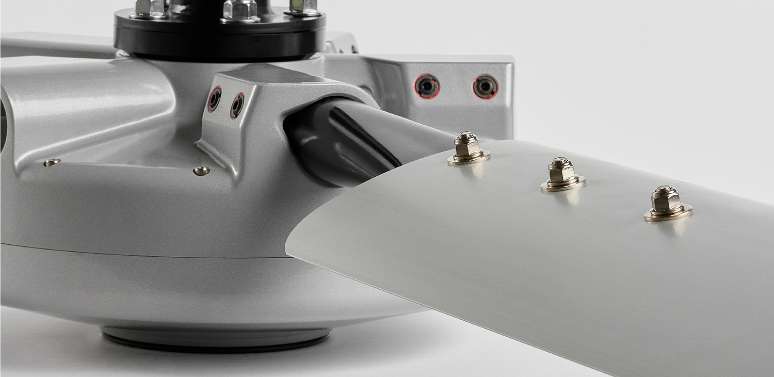
Step 5: Industrial Fan Blade Assembly
Not all HVLS fan models require this step. The following instructions apply to Hunter ECO/XP blades:
- With the numbers on the blade holder facing up, insert the press studs through the holes in the blade holder.
- Hand screw the nylon lock nuts onto the press studs to hold it in place.
- Tighten the nylon lock nuts on the press studs using the 19mm wrench or socket.
- Repeat the process for the remaining plates.

Step 6: Connecting the Variable Frequency Drive (VFD)
Now it's time to install the VFD.Keep in mind that VFD hardware is not usually included, and mounting methods may vary. With that said, when installing ceiling fans, here are the typical steps used to connect your VFD:
- Prep the VFD for mounting to the structure.
- Mount the VFD 5 feet outside the blade sweep area.
- Position the VFD with the plug connector panel facing down.
- Connect the motor cable from the fan to the VFD, being careful to align the pins within the connector before performing a clockwise twist to lock it in place.
- Ensure the designated power over ethernet VFD is the lead drive.
- Connect the ethernet communication cable to port Com 1.
- Run the other side of the communication cable to the HMI.
- Plug the VFD power whip into the appropriate power receptacle and twist clockwise to lock.
Step 7: Installing the HVLS Fan Controls
The final step is installing the HVLS fan controller, an electronic or digital fan controller that can easily control the speed, performance, and air circulation of the fan system. For Hunter Industrial Fans, we have designed digital controllers that offer touchscreen interfaces for easy performance controls that help maximize energy efficiency and airflow dynamics of HVLS fans and industrial fan networks.
To install your fan controller:
- Secure the HVLS fan controller in a convenient location that is easy to access using the provided mounting bracket.
- Ensure that the ethernet cable from the lead drive is connected to the controller.
- Test the controller to ensure that everything is working properly.
If you have any questions or issues while installing your HVLS industrial fans, please contact Hunter Industrial Fans’ Services department to speak with a knowledgeable representative ready to assist you.
Products
Industry Leading Efficiency
EXPLORE OTHER CATEGORIES
Trust Hunter Industrial for HVLS Fan & Installation Services

Share: 
Frequently Asked Questions About How to Install a Ceiling Fan
Want to know more? We've included some commonly asked questions about HVLS fan installation, but please reach out if you need us – we're always happy to help!
A Variable Frequency Drive (VFD) is an electrical component that controls the speed and torque of the electric motor that powers a fan. It provides precise control over the fan's speed and, as a result, the airflow rate. By adjusting the voltage and frequency of the electrical power supplied to the motor, a VFD can control the fan's speed and regulate the amount of air moving through the system. This allows for more efficient operation of the fan and can lead to energy savings, along with improved comfort and air quality in your building.
Once HVLS fan installation has been completed, restore the power, and test the fan to ensure it's working correctly. Make sure it's balanced and not wobbling, and adjust the direction of the blades as needed.
A Human-Machine Interface (HMI) controller is a device that allows a human operator to interact with and control the fan's operation. The HMI controller typically consists of a display panel, such as a touchscreen, that shows information about the fan's system and allows the operator to input commands or adjust settings.
Related Articles
 What Are HVLS Fans?
Learn about HVLS (high-volume, low-speed) fans, which are designed to move large amounts of air at low rotational speeds.
 HVLS Fan Blade Systems and Their Effects on Airflow
Take a closer look at HVLS fan blade systems and see how their designs affect efficiency, airflow and fan performance.
 Top 5 Benefits of HVLS Fans for Warehouses
Discover how warehouse fans can mitigate airflow concerns in your warehouse and other industrial spaces.